 Apparel
 Auto, Home & Tools
 Bags
Bags Business & Office Products
 Drinkware
 Food & Candy
 Outdoor & Leisure
 Stationery
 Technology
 Toys & Novelties
 Wellness and Safety
 Writing
 Bookmarks
 Booklets
 Brochures
 Business Cards
 Custom Calendars
 Door Hangers
 Envelopes
 Event Tickets
 Flyers
 Greeting Cards
 Hang Tags
 Invitation Cards
 Labels
 Letterheads
 Magnets
 Menus
Menus NCR Forms
 Postcards
 Presentation Folders
 Rack Cards
 Sales Sheets
 Stickers
 Trading Cards
 Table Tents
 Banners
 Canvas
 Decals
 Event Tents
 Flags
Flags Posters
 Reflective Signs
 Signs
Signs Table Covers
 Tension Fabric Displays
 Trade Show Booths



We recommend.PDF file. You may also send the file in the following types: jpg, jpeg, tif, tiff, eps, and png.
If you are not receiving the email notifications, we recommend you check your spam/junk folder or contact Customer Service Team.
Production Turn Around Time
Our turnaround time on the website product page refers solely to “Time in Production” or “Production Time”. For every order we receive, we generate digital proof for the artwork submitted. This Digital Proof is shared with you for your approval. Production time starts after the Digital artwork proof is approved.
Once production is complete and the shipping label generated, it may take up to one business day for orders to be picked up by shipping carriers (UPS, USPS, FedEx) and shipped out. Shipping Time is based on the “Shipping Method” selected for your order when placing the order.
Different Production Turnaround Times offered on the website are explained below:
1-2 Business Days: Order placed on a working Monday and proof is approved before the cut-off time of 6 AM PST will have Monday as Day 1. Production on such orders will complete latest by Tuesday EOD, Day 2, and shipping time begins. If artwork proof is approved after the 6 AM PST cut-off time, Tuesday is Day 1 and such orders will complete production latest by Wednesday EOD, Day 2, and ship out.

2-4 Business Days: Order placed on a working Monday and proof is approved before the cut-off time of 9 AM PST will have Monday as Day 1. Production on such orders will complete latest by Thursday EOD, Day 4, and shipping time begins. Based on our workload, we strive to and sometimes are able to ship out such orders on Day 2 or Day 3, but it is not guaranteed. If artwork proof is approved after the 9 AM PST cut-off time, Tuesday is Day 1 and such orders will complete production latest by Friday EOD, Day 4, and ship out.

5-7 Business Days: Order placed on a working Monday and proof is approved before the cut-off time of 9 AM PST will have Monday as Day 1. Production on such orders will complete latest by the following week Tuesday EOD, Day 7, and shipping time begins. Based on our workload, we strive to and sometimes are able to ship out such orders on Day 5 or Day 6, but it is not guaranteed. If artwork proof is approved after the 9 AM PST cut-off time, Tuesday is Day 1 and such orders will complete production latest by the following week Wednesday EOD, Day 7, and ship out.

*Note that some key Holidays and Plant closure days (due to inclement weather) and weekends are not considered Production Days.
Proof Approval Cut-Off Time:
Proofs will be emailed in 2-4 hours, during regular business hours, from the time of submission of the order. However, if there are potential issues with the artwork file, the proofing time would only start once the correct artwork files are received.
1-2 Business Days: Artwork approved by 6 am PST will commence production the same day. Otherwise, production starts on Next Business Day.
2-4 & 5-7 Business Days: Artwork approved by 9 am PST will commence production the same day. Otherwise, production starts on Next Business Day.
Multi-Page Print Orders (Booklets, Calendars):
For any multi-page print orders such as booklets and calendars add an extra day for production, proof preparation, and submitting for review.
Promotional Products Proof Approval Cut-Off Time:
All Proofs are approved before 1 pm PST, and production time will start the following day. (i.e. if a proof is approved before 1 pm PST on 10/1 Day 1 for production will be 10/2, and if it is approved after 1 PM PST Day 1 will be 10/3.)
Promotion Product Production Lead Times:
Lead times of promotional product varies by product, stock availability, the print method selected, and workload. Please check with us for the lead time by using Live Chat, E-mail us at [email protected], or Call us at 888.391.0199.
If the received order differs from what you order, if your order arrives later than promised, or any other flaw compared to actual order placed then please contact our customer team to resolve the problem.
Orders must only be placed through the website.
You can check order status in MyAccount -> Orders Page.
The standard delivery is mentioned while you check out the product and do the payment.
We only charge sales tax on orders within The United State as that is where our main office is located.
Always contact customer service if you have changes to an order or want to cancel an order.
Some of our items will require you to do so. Please call your customer service representative.
Contact our representative to see what best we can do for you.
Browse our site using the latest version of all browsers.
Check your order status any time using the Order Number by logging into your account (MyAccount Section -> Orders page).
Yes we can, Please go to Printed Paper Stock Samples and Select sample order.
Promotional Products:
Your all-inclusive price is primarily determined by,
- The product you select.
- The total number of ink colors needed for printing.
- Decoration method
- Imprint Locations
- The total quantity of items in your order.
Print Products:
- Quantity
- Size
- Shape
- Paper Stock
- Coating
- Printed Side
- Print Turnaround Time
Note: Custom request will affect the cost.
We are always happy to help! Most design questions can be answered by our Design Service representatives.
Depending on the quantities the jobs are run on different presses. If the quantity is less than 500 job it is run on Digital press whereas, quantities higher than 500 are run on Offset Press, which might result in shifts (color, coating, and quality).
Also, we use a gang run process where many jobs are put on a batch together and this can slightly affect color. We cannot guarantee color matching between jobs, sets, different stocks, previous runs and other printers.
*disclaimer: Occasionally, quantities of up to 5000 and more might be printed using digital printing to meet turnaround deadlines.
If the printed product delivered to you does not meet the standards or has defect in them. You can reach us via Online Chat or by taking digital images of the problem in your product and emailing them to [email protected] with the order# in the subject line.
Our Quality Team will check the digital images, evaluate them with the artwork that was submitted determine the cause in quality lapse if any and will either decide to send them to Reprint or conclude that the printed product meets the standard requirements and respond back to the customer with the findings.
Due to the custom nature of our prints, we do not accept returns. If something is wrong with your order, please email [email protected] with relevant details and pictures of the printed product and we will work with you to fix it.
Our layout templates are not interactive as they are for design placement only. Depending upon which software program you are using, open the PDF or JPG file in your software program to set up guidelines. Use the red (bleed), blue (trim), green (caution zone), and green/yellow dotted lines (folding) to set up your artwork layout.
You can upload .pdf, .tif, .jpg, or .eps files. We mostly recommend .pdf files.
Vector graphics are created by illustration software such as Adobe Illustrator.
Resolution is one of the most critical aspects in ensuring a good quality of print. Image Resolution of 300 dpi, is recommended for good quality picture print.
The resolution of an image is defined as pixels per inch (PPI) or dots per inch(dpi). Each dot or pixel dimension and its resolution have a relation to the physical size of the image.
So an image of 1600 x 1600 pixel with a resolution of 72 PPI would represent an image of physical size 22.22" x 22.22". The same image of 1600 x 1660 pixels but saved with a higher resolution, say 300 PPI at around 5.33" x 5.33".
Meaning the higher the resolution, the more pixels it can accommodate in a square inch area. So the higher the resolution, the better the quality of the image and print collateral being "Non-Pixelated ".

The bleed area is an extra space added to the actual dimension of the card. Bleeds ensure strips of white paper do not show on the edges of your card when cut to size. If your design, has colors on your product that stretch to the edge of the document, it's best to let those colors stretch, or "bleed" past the edge of the product size. That ensures your colors go all the way to the edge of your document. It is a recommended practice to have all your design elements within the bleed area.
If your choice of the business card is sized 3.5" x 2" inches, then your design(artwork such as background colors or images) should extend by a quarter of an inch (.25") for each dimension of the card. As a general rule extend your design by .25" or .125" (1/8”) on each edge of the card.
So in the above example, you will submit your artwork/image of dimension 3.75" x 2.25" inches. The 1/8 inch added extra on each edge of the card will be trimmed off during the cutting process, so you get the appropriate card as ordered 3.5" x 2" inches.

CMYK stands for Cyan, Magenta, Yellow, and Black. The CMYK printing is one of the most common methods used for print collaterals and is also known as 4-color-process printing.
The artwork/files submitted to us should be the color mode of CMYK as one of the criteria to qualify as a print-ready file.
Files submitted are in other colors modes such as RGB or Pantone, then as a standard print practice, they will be converted to CMYK during our proofing check process.
Note: The conversion from other color mode formats to CMYK may cause a shift in the colors.

Dual Raised Printing is a specialized embellishment technique that features two distinct raised textures, creating a striking visual and tactile contrast. These cards are printed on 16pt paper, laminated with a 1.5mil scuff-resistant, soft-velvet suede finish, and enhanced with either:
- Two different raised foil colors, or
- A combination of raised UV and one raised foil color.
Design Note:
To create a Dual Raised product, you must provide two separate mask files in addition to your artwork—one for each raised embellishment. You can choose between two raised foil colors or one raised foil color combined with raised UV.
When submitting files for print, Dual Raised jobs need a ‘separate’ files also known as the “Mask” file which is in addition to standard CMYK artwork files. The ‘mask’ file reflects the area which will have the special print treatment. This is how you can prepare files for Raised Foil printing:
Step 1: Identify the area(s) you want to apply to the Dual Raised locations of your design. (Sample shown will be processed with Gold and Holographic Raised Foil)
Identify the areas (text/logo) from your artwork / design file. Sample design for your ref.
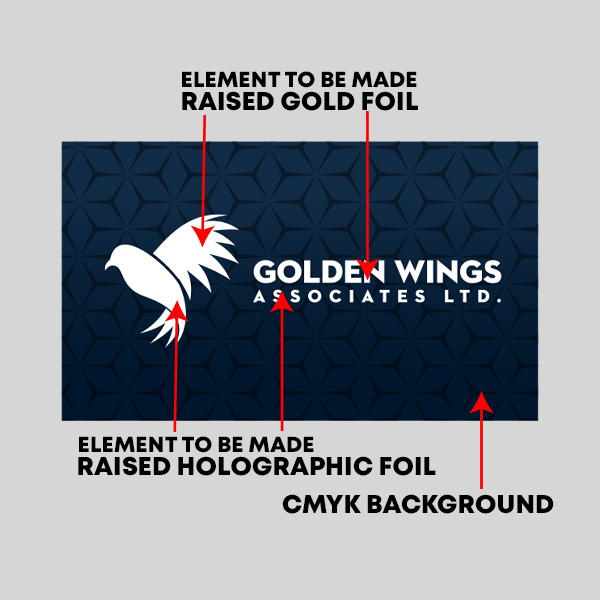
Step 2: Prepare a separate mask file in Vector Format. Two mask files will need to be created. (Sample shown will be processed with Gold and Holographic Raised Foil)
For each printed side that has raised application, create a separate file with only raised elements. The file will be black and white, where the black represents the areas of raised application.
Note: The elements should be created 100% black and as a vector format.
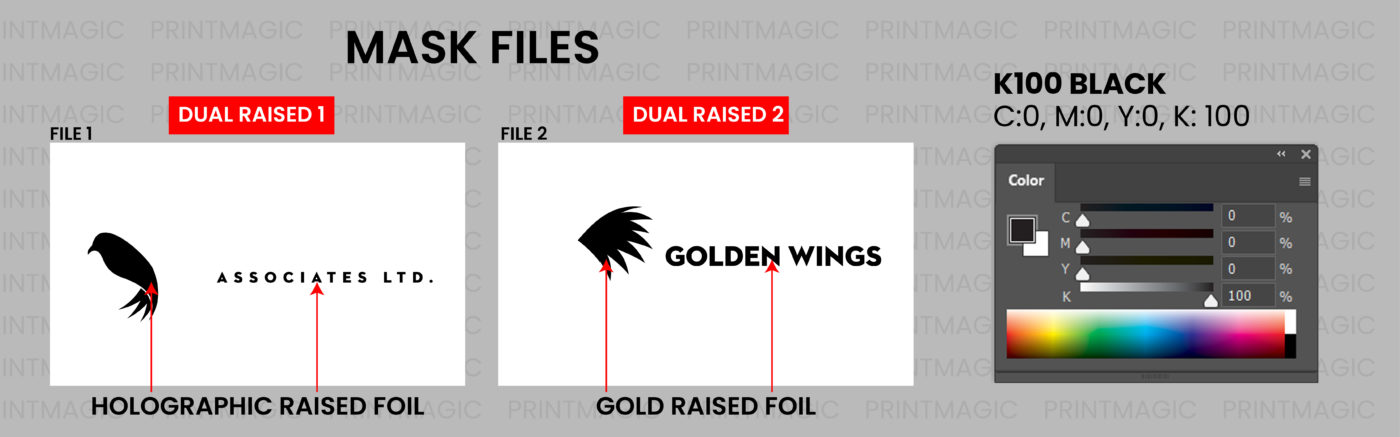
Step 3: Check alignment and remove CMYK elements.
You should practice and make sure that your artwork, both the standard CMYK and mask file are aligned correctly.
Once you are satisfied with the alignment, you can delete the elements from the standard CMYK file which are available within the mask file. Thus, ensuring that you provide a solid background to the foil printing.
CMYK File sample.
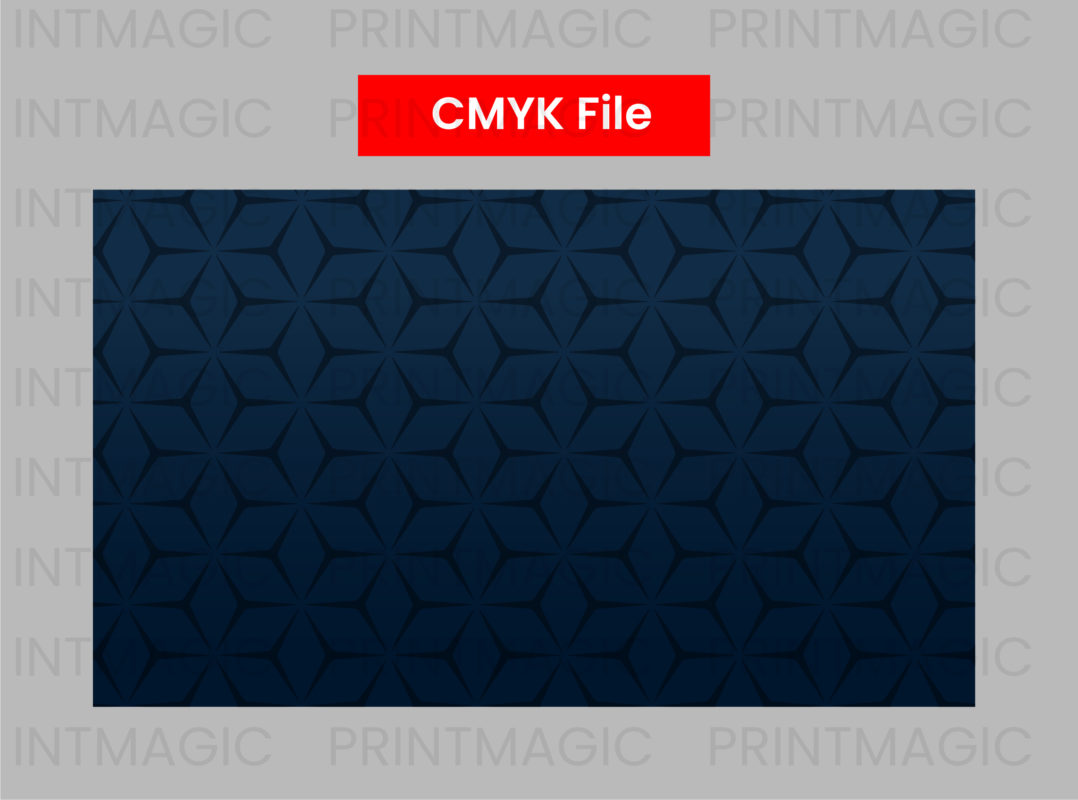
Step 4: Saving the artwork files for submission
Save your artwork files with proper naming conventions, so that it is easy to identify which file is to be used for the printing process. For example, a Dual job with Dual Raised application on front only will have the following names:
- File-Name-Front-CMYK
- File-Name-Front-Gold-Mask
- File-Name-Front-Holographic-Mask
- File-Name-Back-CMYK
Final Product
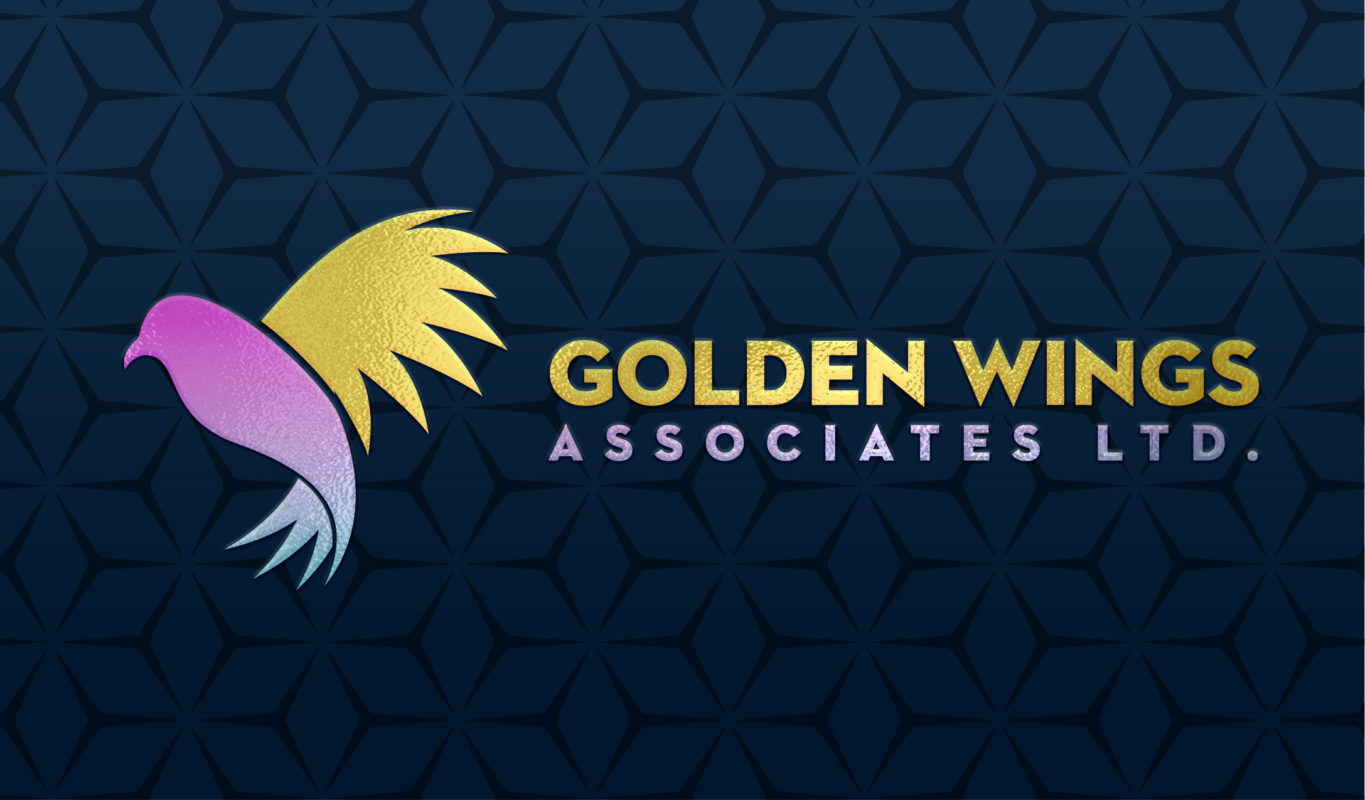
You can choose either two foil colors or one foil color with a raised spot UV option. Dual-raised foil jobs require two mask files: a raised-foil mask file and a second mask file for either another raised foil color or raised spot UV, along with the regular print file. The mask file must be a vector file created in a program like Adobe Illustrator.
When setting up the mask file, use solid 100% black (C 0%, M 0%, Y 0%, K 100%) to indicate where you want the foil. Do not use shadows, glows, or grayscale images, as they will not produce the desired effect. Any white areas in the mask file will indicate no foil. Knockouts are not recommended since there may be a shift of up to 1/16” when the foil is applied.
Printing Under the Foil Mask
It is highly recommended to use a solid background behind the foil mask. Artwork or text placed under the foil mask may become visible through the foil, which can affect the final appearance. Knockouts are not advised, as there may be a slight shift in alignment during the application process.
Ensuring the Best Results for Dual-Raised Foil Cards
To achieve the best results, foil coverage should not exceed 30% of the total artwork. Exceeding this limit may result in a wavy or uneven finish. However, up to 50% coverage is acceptable when using patterns, thin strokes, or small shapes. Ideally, the maximum recommended foil coverage for a single area should not exceed 1” x 1”.
Minimum Font Size for Raised Foil Artwork
For the best readability, font sizes should be at least 10pt. If using bold fonts or fonts with thicker strokes, it is recommended to use a minimum font size of 12pt to ensure clarity and sharpness.
Yes, we offer design services for mask file preparation. Contact Us or send us an email with your design files at [email protected]
We offer Foil printing on a 14pt Uncoated & 16pt C2S Premium Gloss Paper. If you wish to have a smooth fill, you can choose 16pt C2S Premium Gloss Paper with a Silk Lamination. You will get a Foil Printed product on a smooth feel paper.
In foil printing we offer 7 foil colors, however, a print job can only have 1 of these 7 colors. If you need 2 different foil colors on the same print job check our akuafoil print products.
Yes, gradients can be printed in akuafoil printing. However, foil printing offers 7 different solid foil colors.
Check our akuafoil print products.
Yes, we can print Foil and Spot UV on the same card provided Foil and Spot do not overlap. Also, while submitting the files for printing you will need to source Mask files for Spot and Foil separately.

When submitting files for print, foil jobs need a ‘separate’ file also known as the “Mask” file which is in addition to standard CMYK artwork files. The ‘mask’ file reflects the area which will have the special print treatment. This is how you can prepare files for Foil printing:
Step 1: Identify the area(s) you want to apply the Foil to.
Identify the areas (text/logo) from your standard CMYK artwork file.

Step 2: Prepare a separate mask file in Vector Format.
For each printed side that has a foil application, create a separate file with only foil elements. The file will be black and white, where the black represents the areas of foil application.
Note: The elements should be created in 100% black and as a vector format

Step 3: Check alignment and remove CMYK elements.
You should practice and make sure that your artwork both the standard CMYK and mask file are aligned correctly.
Once you are satisfied with the alignment, you can delete the elements from the standard CMYK file which are available within the mask file. Thus, ensuring that you provide a solid background to the foil printing.

Step 4: Saving the artwork files for submission
Save your artwork files with proper naming conventions, so that it is easy to identify which file is to be used for the printing process. For example, a Foil job with Foil application on both sides will have the following names:
- File-Name-Front-CMYK
- File-Name-Front-Mask
- File-Name-Back-CMYK
- File-Name-Back-Mask

Final Product

- Always use solid color behind the Foil application. We do not recommend having any artwork or text under the foil mask since it might be visible through the foil mask.
- Foil Coverage should be no more than 30% of the artwork, otherwise, the foil will be wavy and will not look good. The only time a 50% coverage is acceptable is with patterns, thin strokes, or small shapes. Ideally, the size of the area, shape, or image covered with foil should not exceed 1in x 1in.
- We do not recommend having fonts smaller than 10pt on the Foil Artwork. However, if you use fonts with thicker strokes or bold fonts, we do not recommend having fonts smaller than 12pt.
- The line strokes should be no less than 1 pt.
- Avoid thin line-arts and fine details for Foil application
Foil printing is the process of applying a thin coat of metallic or pigmented foil to paper stock using a combination of heat, and pressure. It is used to create a special looking printed piece on your artwork. Foil printing is the best way to give your products a high-end and customized look with effects such as elegant metallics, ultra-glossy colors, and high-tech effects.
For orders with Foil Stamping with up to 36 total square inches of coverage, there is no additional charge for dies. For order not within these parameters custom quote is provided. Charges for dies vary according to the size and amount of detail in your design. We will notify you of any additional costs before processing your order.
Yes, we offer design services for mask file preparation. Contact Us or send us an email with your design files at [email protected]
Spot UV has a flat finish whereas Raised Spot UV has a raised finish, that if you run your fingers over the card you will feel the UV. The depth of the UV is approximately 50 microns.
Yes, we can print Spot UV and Foil on the same card provided Spot UV and Foil do not overlap. Also, while submitting the files for printing you will need to source Mask files for Spot and Foil separately.
Yes, This will be like a Super Gloss coating all over the card. When order you will need to select the option of Full UV coating, rather than Spot UV.
When submitting files for print, SPOT UV jobs need a ‘separate’ file also known as the “Mask” file which is in addition to standard CMYK artwork files. The ‘mask’ file reflects the area which will have the special print treatment. This is how you can prepare files for SPOT UV printing:
Step 1: Identify the area(s) you want to apply the Spot UV to.
Identify the areas (text/logo) from your standard CMYK artwork file.

Step 2: Prepare a separate mask file in Vector Format.
For each printed side that has SPOT UV application, create a separate file with only SPOT UV elements. The file will be black and white, where the black represents the areas of SPOT UV application.
Note: The elements should be created in 100% black and as a vector format.

Step 3: Check alignment
You should practice and make sure that your artwork both the standard and mask file are aligned correctly.

Step 4: Saving the artwork files for submission
Save your artwork files with proper naming conventions, so that it is easy to identify which file is to be used for the printing process. For example, a Spot UV job with Spot UV application on both sides will have the following names:
- File-Name-Front-CMYK
- File-Name-Front-Mask
- File-Name-Back-CMYK
- File-Name-Back-Mask

Final Product

- SPOT UV Coverage should be no more than 30% of the artwork. Otherwise, the cards will be stuck together and become a block of cards. Up to 70% coverage is acceptable only with patterns, thin strokes, or small shapes. Ideally, the size of the area, shape, or image covered with raised foil should not exceed 1in x 1in.
- We do not recommend having fonts smaller than 9pt on the SPOT UV Artwork.
- The line strokes should be no less than 0.5 pt.
- Use proper kerning between the text to avoid smudging of the clear coating.
- When creating the mask file for fine details, cover it with the solid fills rather than just the design as is.
Spot UV is the process of applying a clear, shiny coating to specific areas of artwork to create an eye-catching contrast, giving your artwork a luxury product effect.
Yes, we offer design services for mask file preparation. Contact Us or send us an email with your design files at [email protected]
When submitting files for print, Raised SPOT UV jobs need a ‘separate’ file also known as the “Mask” file which is in addition to standard CMYK artwork files. The ‘mask’ file reflects the area which will have the special print treatment. This is how you can prepare files for Raised SPOT UV printing:
Step 1: Identify the area(s) you want to apply the Raised Spot UV to.
Identify the areas (text/logo) from your standard CMYK artwork file.

Step 2: Prepare a separate mask file in Vector Format.
For each printed side that has Raised SPOT UV application, create a separate file with only Raised SPOT UV elements. The file will be black and white, where the black represents the areas of Raised SPOT UV application.
Note: The elements should be created in 100% black and as a vector format.

Step 3: Check alignment
You should practice and make sure that your artwork both the CMYK standard and mask file are aligned correctly.
Step 4: Saving the artwork files for submission
Save your artwork files with proper naming conventions, so that it is easy to identify which file is to be used for the printing process. For example, a Raised Spot UV job with Raised Spot UV application on both sides will have the following names:
- File-Name-Front-CMYK
- File-Name-Front-Mask
- File-Name-Back-CMYK
- File-Name-Back-Mask

Final Product

- Recommended UV coverage for artwork is less than 30%. Up to 70% coverage is acceptable only with patterns, thin strokes, or small shapes.
- We do not recommend having fonts smaller than 9pt on the Raised SPOT UV Artwork.
- The line strokes should be no less than 0.5 pt.
- Use proper kerning between the text to avoid smudging of the clear coating.
- When creating the mask file for fine details, cover it with the solid fills rather than just the design as is.
Raised Spot UV involves a special spot UV process where a layer of UV ink with a depth of 50 microns is applied to your artwork on a specified area of your design, thus giving that area a raised effect.
Raised Foil printing is the process of applying a thin coat of metallic or pigmented foil to paper stock using a combination of heat, and pressure, which appears as a raised surface on the printed stock. It is used to create a special looking printed piece on your artwork. Raised Foil printing is the best way to give your products a high-end and customized look with effects such as elegant metallics, ultra-glossy colors, and high-tech effects.
- Ensure that the Foil Coverage should be no more than 30% of the artwork, otherwise the foil will be wavy and won’t look good.
- Do not have any Text behind the Foil.
- Avoid thin line-arts and fine details for Raised Foil application.
- Use Bold fonts with proper kerning between characters.
- We do not recommend having fonts smaller than 10pt on the Raised Foil Artwork. However, if you use fonts with thicker strokes or bold fonts, we do not recommend having fonts smaller than 12pt.
- The line strokes should be no less than 1 pt.

When submitting files for print, foil jobs need a ‘separate’ file also known as the “Mask” file which is in addition to standard CMYK artwork files. The ‘mask’ file reflects the area which will have the special print treatment. This is how you can prepare files for Raised Foil printing:
Step 1: Identify the area(s) you want to apply the Foil to.
Identify the areas (text/logo) from your standard CMYK artwork file.

Step 2: Prepare a separate mask file in Vector Format.
For each printed side that has raised the foil application, create a separate file with only raised foil elements. The file will be black and white, where the black represents the areas of raised foil application.
Note: The elements should be created in 100% black and as a vector format.

Step 3: Check alignment and remove CMYK elements.
You should practice and make sure that your artwork both the standard CMYK and mask file are aligned correctly.
Once you are satisfied with the alignment, you can delete the elements from the standard CMYK file which are available within the mask file. Thus, ensuring that you provide a solid background to the foil printing.
Step 4: Saving the artwork files for submission
Save your artwork files with proper naming conventions, so that it is easy to identify which file is to be used for the printing process. For example, a Foil job with Foil application on both sides will have the following names:
- File-Name-Front-CMYK
- File-Name-Front-Mask
- File-Name-Back-CMYK
- File-Name-Back-Mask

Final Product

Mask files are produced for the printer to know the exact location of the special finish to be applied on the product. Vector format files are recommended for their quality output. As raster formats are based of pixels they appear distorted/Jagged edges with the different color tones at the border/edges, so there are chance that the mask files might get rejected at prepress. Artwork in the mask files are to be produced in 100% K. To avoid rejection and get a High-quality output it is always best practice to design Mask files in Vector format.
Foil has a flat finish foil whereas Raised Foil has a raised foil finish, if you run your fingers over the card you will feel the foil. The height of the foil is approximately 60 microns.
Yes, we offer design services for mask file preparation. Contact Us or send us an email with your design files at [email protected]
Yes, printing Akuafoil and SPOT UV are possible. In fact, when the Akuafoil printing is combined with SPOT UV the final output produced has a sparkling foil finish and an ideal reflection giving the product a premium feel.
Yes, with Akuafoil it is possible to printing custom colors and multi-color jobs for foil finishes.
Yes, very much! Akuafoil provides the opportunity to print 2 different foil colors in one printed piece.
If you need Flat Foil Stamping, check our Foil finish products (Foil Business Cards, Foil Postcards, Foil Flyers, Foil Hang Tags)
Yes, printing gradients with Foil is possible in Akuafoil. With Aquafoil, you can turn a wide range of CMYK colors into multi-colored foils. Aquafoil uses a special processed foil system that is applied under a 4/c process to create an array of foil colors.
If you need Flat Foil Stamping, check our Foil finish products (Foil Business Cards, Foil Postcards, Foil Flyers, Foil Hang Tags)

Like normal Foil Printing artwork requirement, even Akuafoil printing needs two files CMYK Artwork File and Mask Artwork File to indicate where Akuafoil to be applied.
When preparing the Mask file for Akuafoil Printing use 100% K where Akuafoil needs to be applied and white where the Akuafoil is not to be applied. Also, ensure to design the mask file in vector file format.
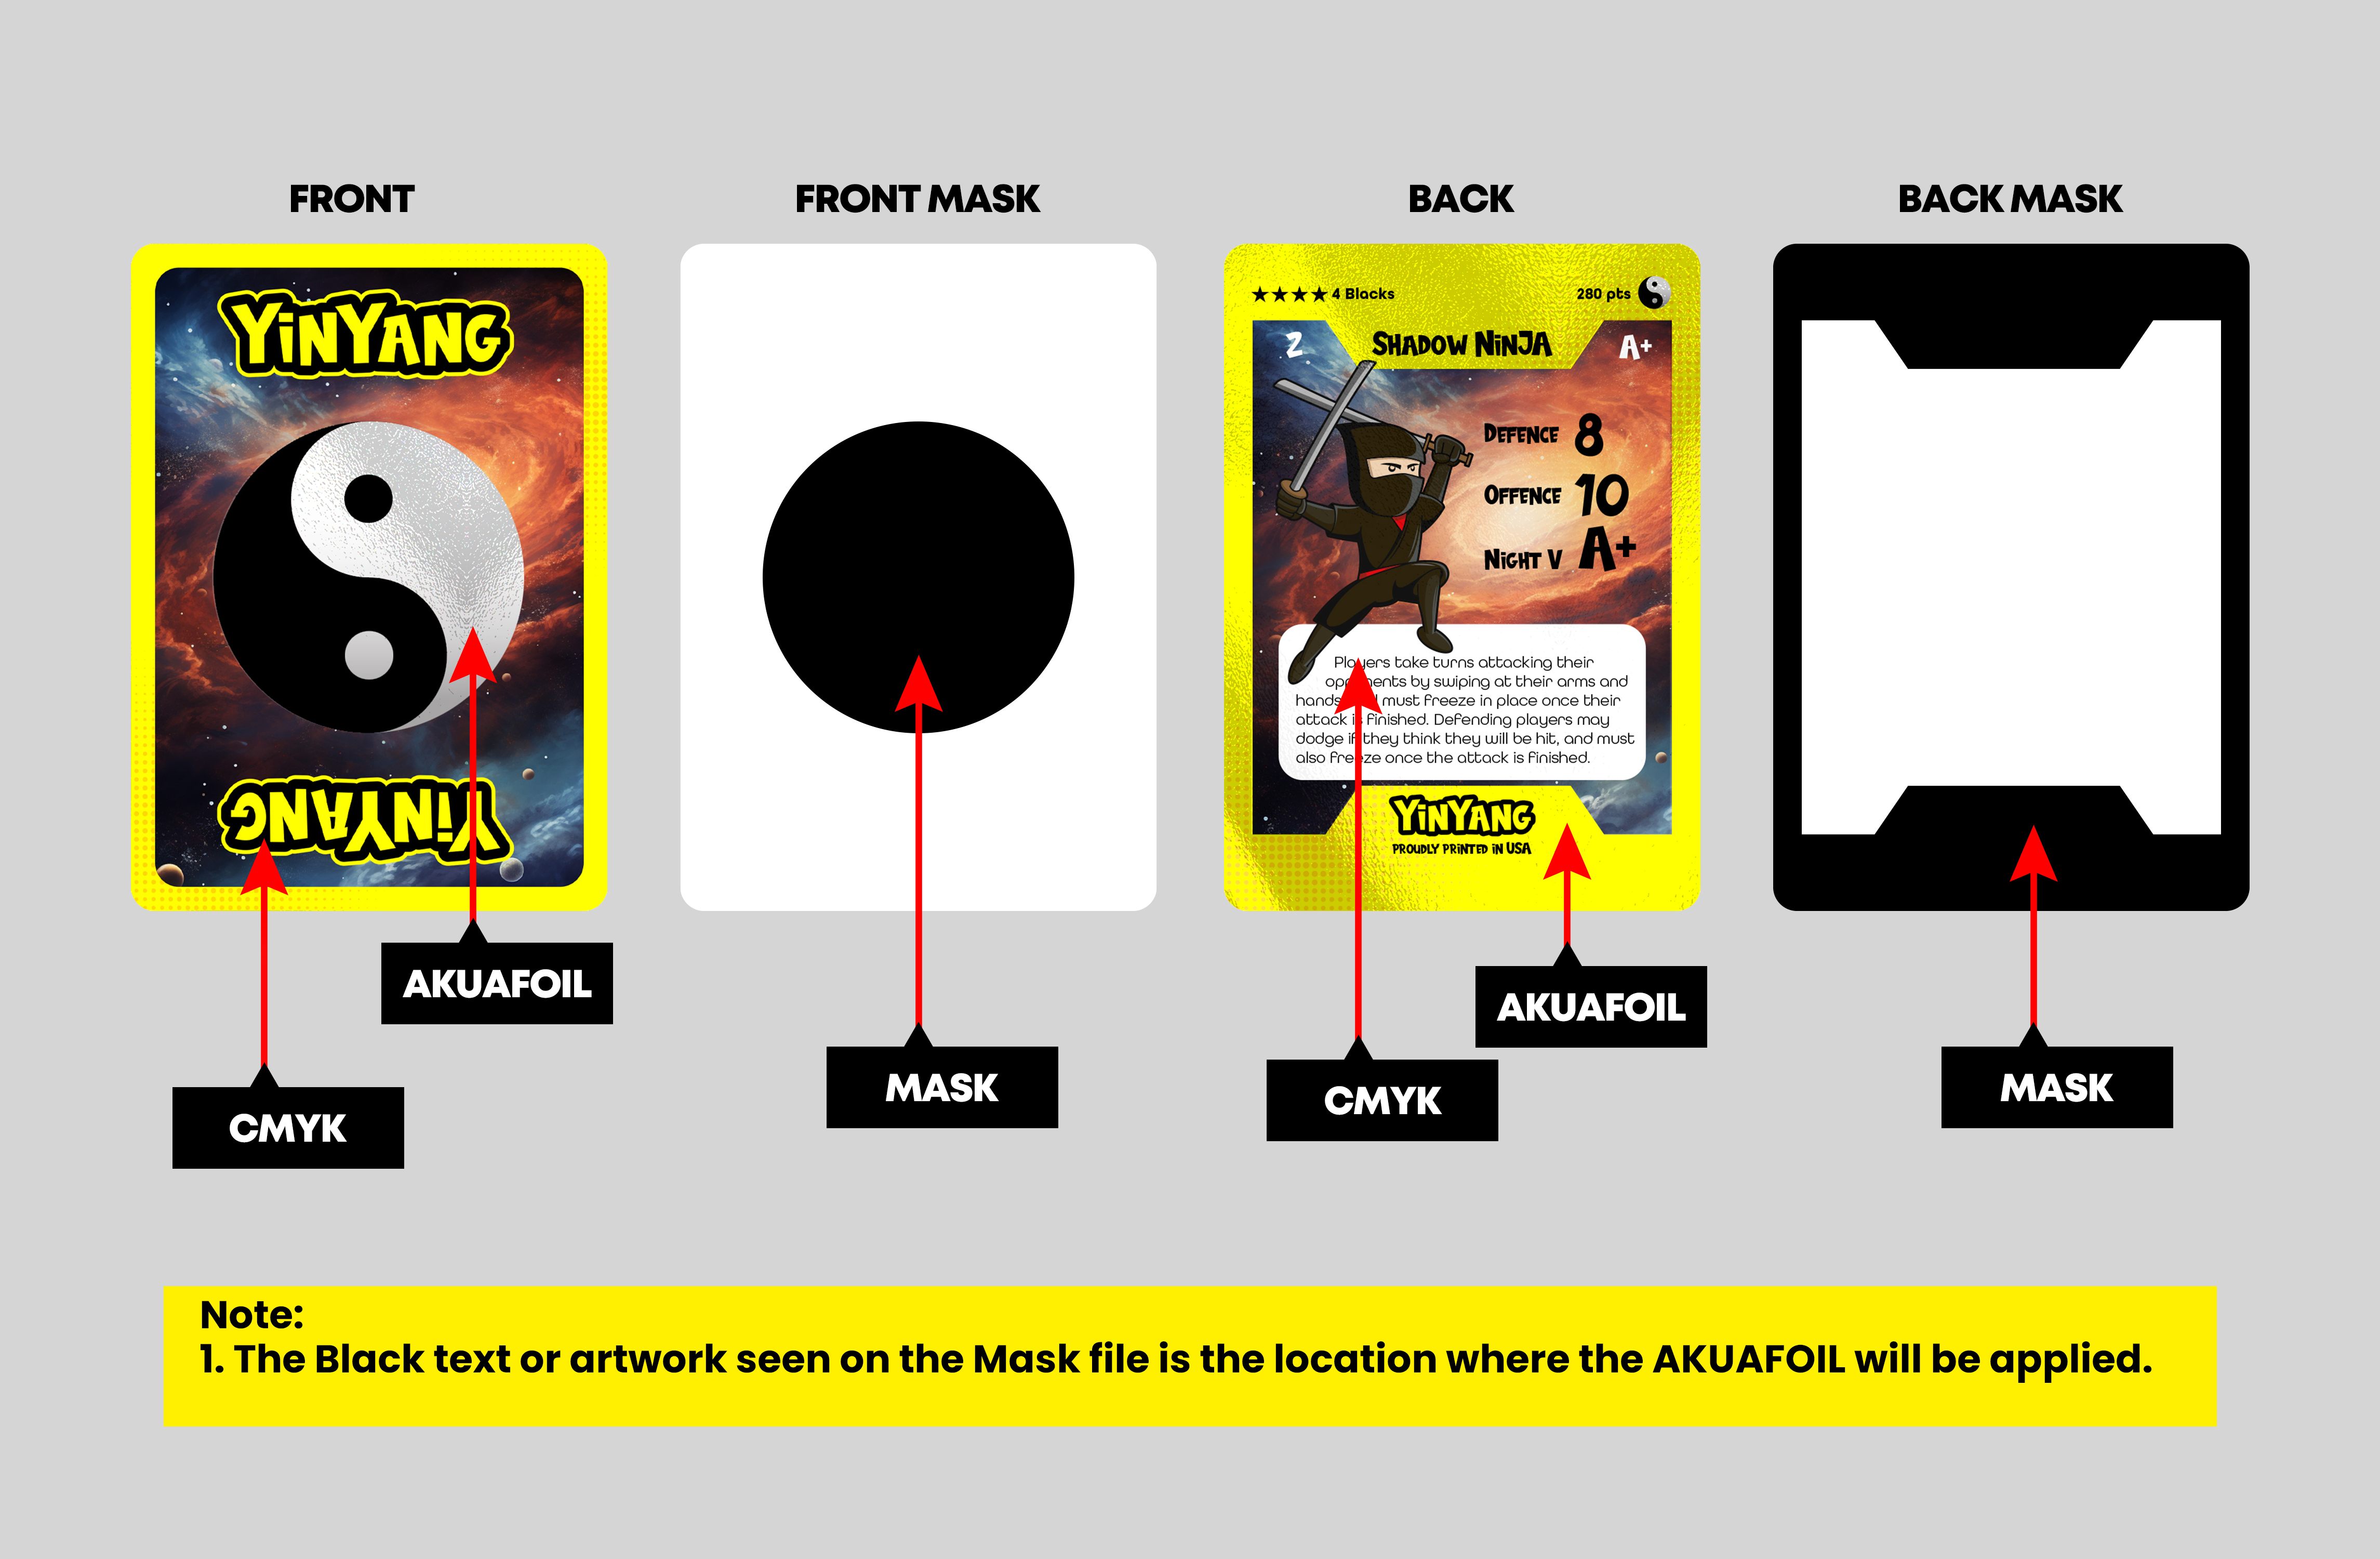
With traditional printing methods, you can print a limited # of Foil on your product. But, with the advancement in technology now it is possible to print multiple foil colors on your product, this new technology is called Akuafoil printing.
As we know that foils can be printed in solid colors, but with Akuafoil it is possible to print Gradients and multi-color foils. Akuafoil uses a special processed foil system that is applied under a 4/c process to create an array of foil colors. When you want your product to stand-out Akuafoil printing is what you need.
White ink printing on Brown Kraft paper is possible when a White mask file is shared along with the CMYK file for printing. If a white mask file is not provided, the white color within the artwork won’t print on Brown Kraft paper.
The white mask file has used an overprint to get the white ink printed on the Brown Kraft Paper. Also, the white mask files assist in printing vibrant, and crisp colors.
The white mask file acts as a base for CMYK providing a bright white surface. Areas without white ink will appear darker due to the color of the stock.
Hence, when printing white ink on Brown Kraft Paper you are be required to submit an extra artwork file along with your design files. This extra artwork file is called White Mask File.
Preparing Mask file: Create a black and white pdf file with black color values of K = 100% (C=0 M=0 Y=0 K=100). Black areas represent where you want the finish to be applied and white means no finish will be applied.
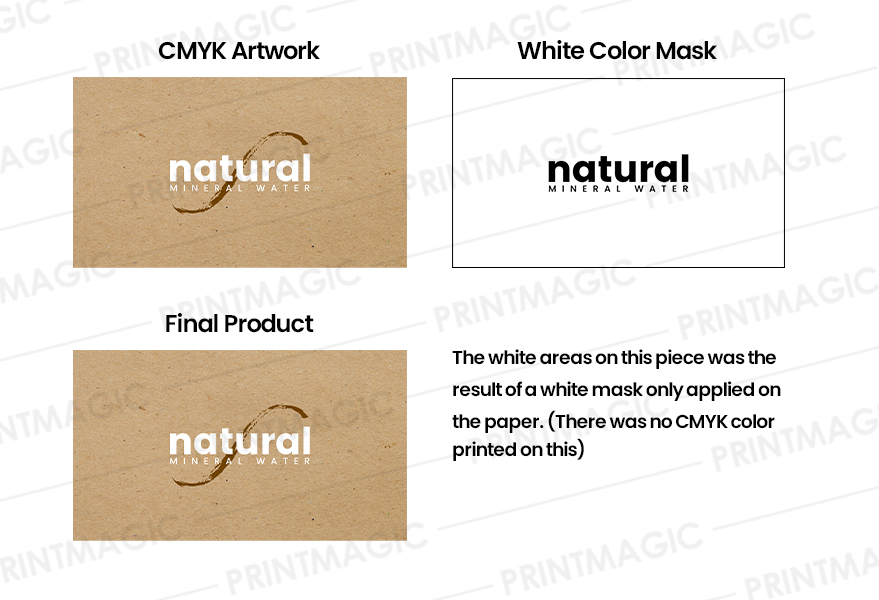
Remember the following when creating a white mask for your white ink base:
- A white ink base will be printed behind any color that’s in your Artwork Layer.
- Areas with color but without a White Mask will be printed with color directly on the material.
- Areas with color and a White Mask will be printed as an opaque or solid color.
- Areas with a White Mask and no color will be printed as white.
Note: White Masks file must be made in vector format and be saved as EPS or PDF. Please be aware that anything less than 100%K will be transparent and allow the brown stock to show through.
Samples
The below image represents the difference when an artwork is printed with and without the white mask file.
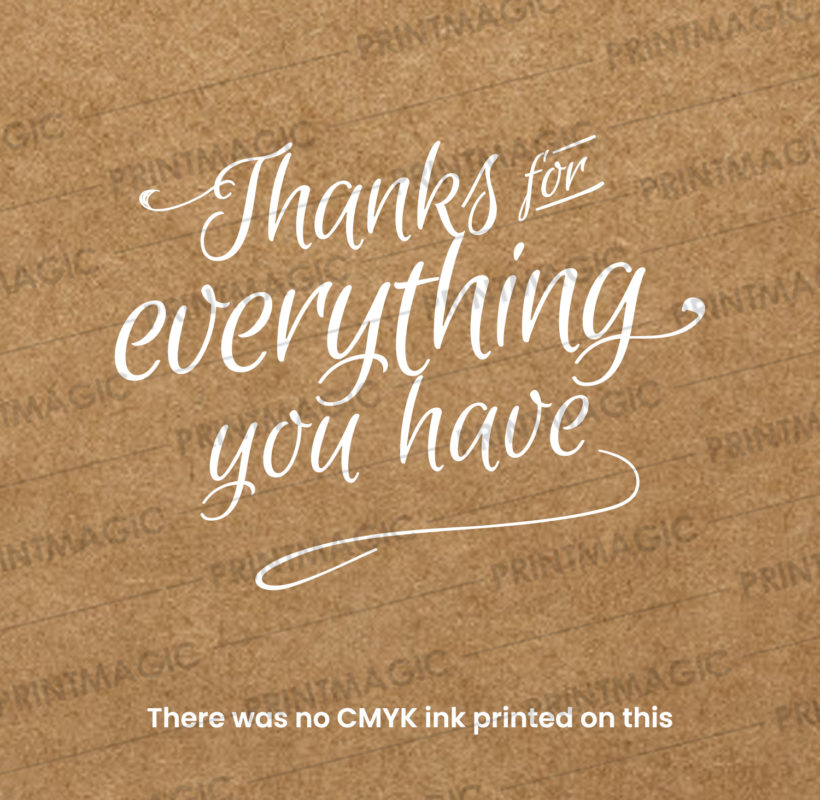
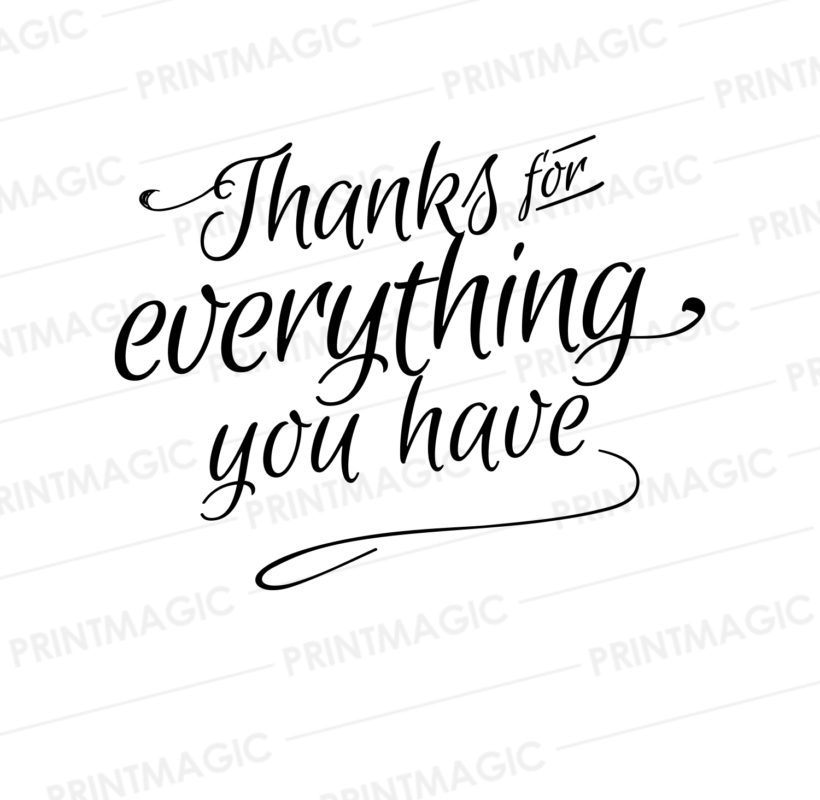
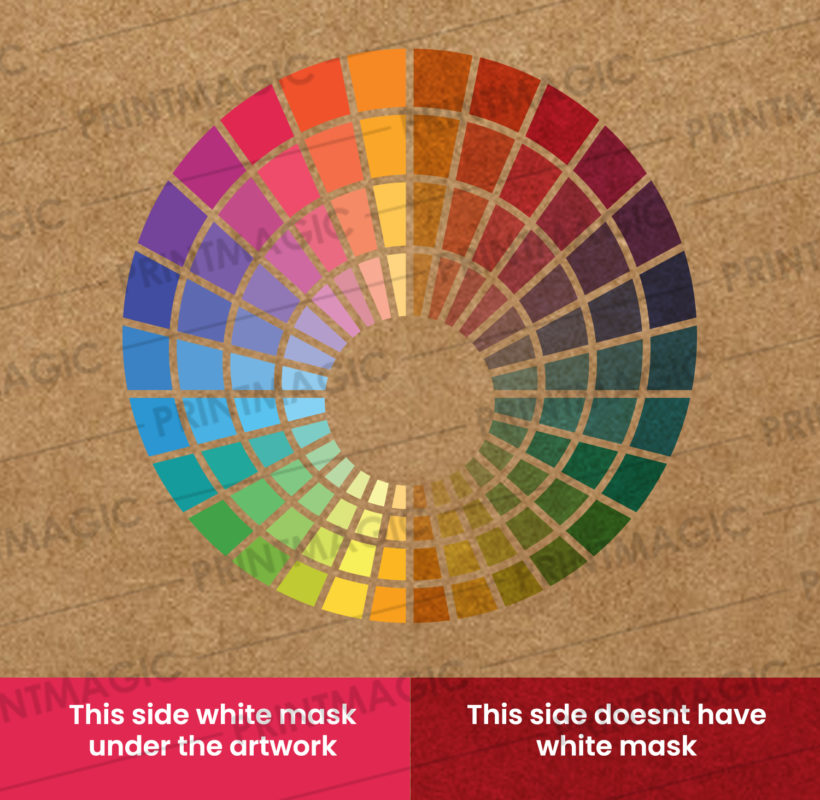
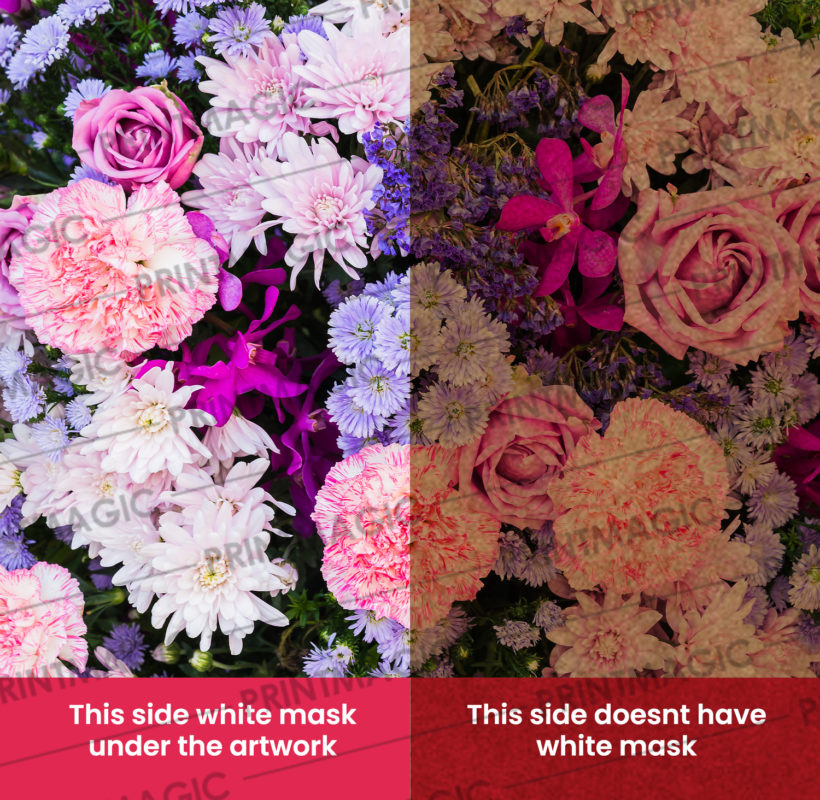
For printing white ink on Brown Kraft Paper white mask file is a mandatory file. See example
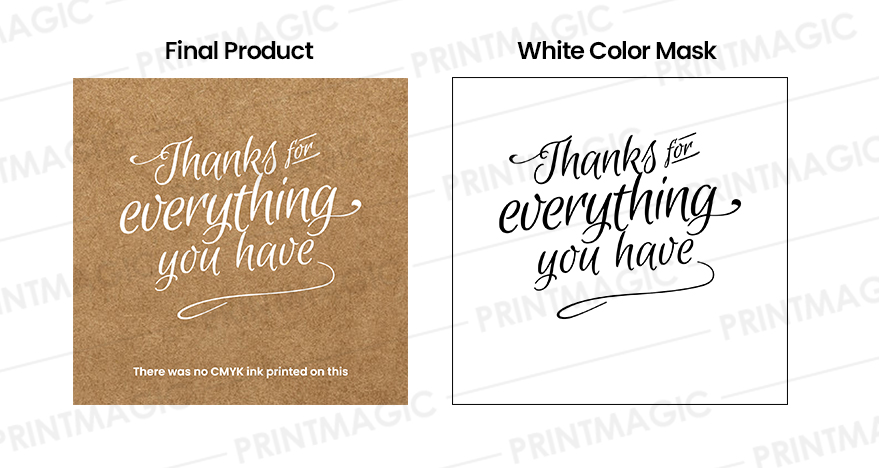
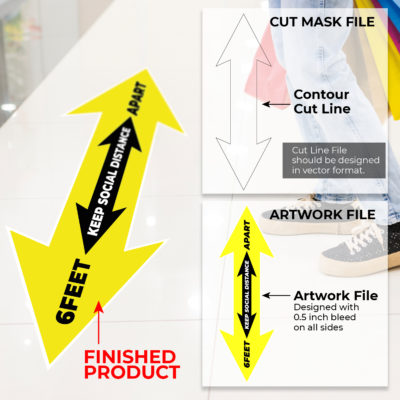
- Regular CMYK Artwork: Design the file with bleeds of 0.5” on all sides of your contour artwork shape. Extend the background color or image beyond the cut line by 0.5” on all sides.
Note: The bleed artwork will be trimmed and will not be a part of your finished product.
2. Contour Cut Mask File: This file indicates where your artwork will be cut.
- This file should only consist of the Contour Cutline designed in 100% solid black (C:0, M:0, Y:0, K:100).
- Cut Mask File should be designed in vector format. We do not accept cut mask files in raster format.
- Your contour cut line should be a smooth fully closed path. No disconnected lines or open paths will cut.
Note:
- Only one cut per order will be allowed. Please do not add multiple cuts in a single file.
- Printmagic will not reprint any order attributed to improper file setup or layout.
Variable numbering is available on 14PT, 16PT, 18PT, and 100lb Gloss Cover stocks. For custom stock options, please email us at [email protected]
Yes. You’ll receive a digital proof by email for review and approval. If you approve it, your order will move to production. If you reject it, you can request changes or send new files by emailing us at [email protected]
If you're printing color on both sides with numbering on the front, you need to submit 3 files: Front CMYK, Back CMYK, and a Front FPO file. If numbering is on the back, prepare the files accordingly. The CMYK file includes your design without the numbering and can be in PDF, JPG, JPEG, TIF, TIFF, EPS, or PNG format. The FPO file shows where the numbering should go and must be in PDF format only. The font, size, and color of the numbering will follow what's shown in the FPO.
See the image below.
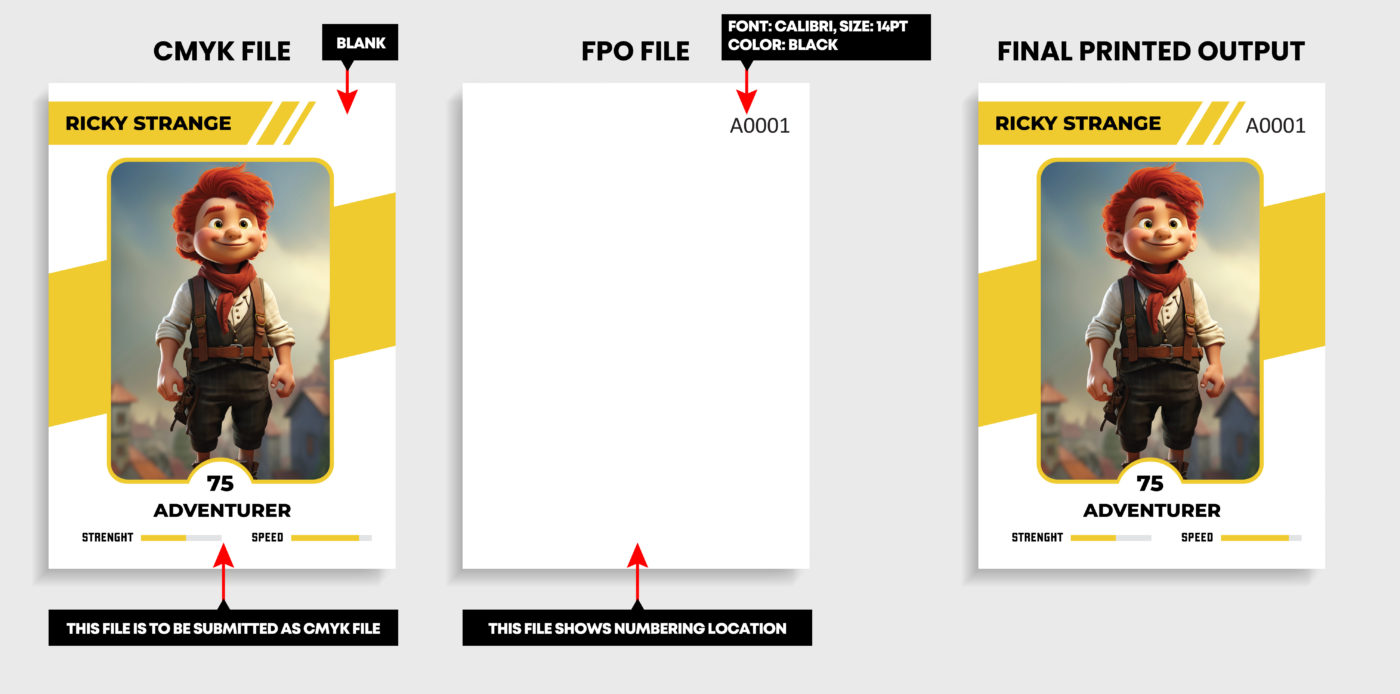
You’ll need to prepare an FPO file that shows the location of the Variable Numbering and provide it in PDF format. See the image for reference.
We will only print the quantity you ordered. Extra numbers in your CSV file will not be printed.
Format the cells as text before entering your numbers. Right-click on the cells and select "Format Cells" and then choose "Text." Enter your numbers—you should see the leading zeros. If the zeros disappear after reopening the file, don’t worry—they are still there. As long as you saw them before saving, it’s safe to upload the CSV.
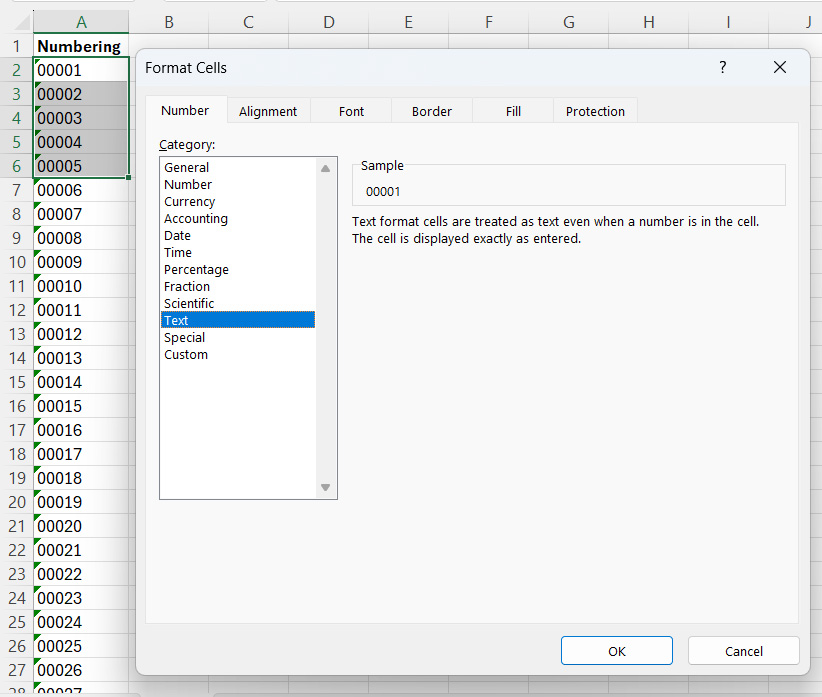
For artwork, PDF is recommended, but you can also upload JPG, JPEG, TIF, TIFF, EPS, or PNG files.
For variable numbering, only CSV (comma-delimited) file is accepted. Each record in the CSV can have up to 5 digits or characters.
Font: Calibri is standard, but Arial or Courier can also be used
Size: 14pt is standard; 10pt, 11pt, or 12pt are also allowed (not smaller than 10pt)
Color: Preferred Black ink only. But red, or white numbering is possible in special cases.
Visibility: If the background is dark, remove or lighten it behind the numbers
Length: Each number can have up to 5 digits or characters. For eg. A0001, 00001 and so on. No Special characters, underscores or dashes allowed
If your data file contains more records than the run size you ordered, you will be notified and asked to either upload a revised CSV data file with less records, or you will be asked to cancel the order and place an order for the next available run size higher than the number of records.
PrintMagic will print the artwork you provided for the full run size ordered. Variable addresses will be printed for each record in your CSV data file. The entire job, with addressed and non-addressed envelopes, will be carton-packed and delivered via the chosen delivery method.
No. PrintMagic does not proofread nor flag or correct errors. It is your responsibility to double-check and ensure the validity of your data. Invalid addresses, typos, misspellings, inaccurate zip codes, etc. are not the responsibility of PrintMagic.
Artwork file formats: We recommend pdf. You may also send the following types: jpg, jpeg, tif, tiff, eps, and png.
Data file formats: We accept CSV (comma delimited) format only. You can upload the CSV file with your artwork in the File Upload section or send us your files via email post placing the order with the details of the order.
To download a CSV template click here.
On the CSV file, the header columns should be labeled exactly as follows:
- column A: FULL NAME
- column B: COMPANY
- column C: ADDRESS
- column D: SUITE/APT
- column E: CITY STATE ZIP CODE
Here's a sample of what the Mailing List Excel sheet should look like:

We cannot guarantee the quality of inkjet printing on Envelopes with Variable Addressing, so it is not recommended.
- 3.875" x 8.875" #9 Envelopes
- 4.125" x 9.5" #10 Envelopes
- 4.375" x 5.75" A2 Envelopes
- 4.75" x 6.5" A6 Envelopes
- 5.25" x 7.25" A7 Envelopes
The Variable Addressing portion has a default font of 12pt Arial, black only.
Note:- if your CSV data file contains extremely long names or addresses, the font will automatically be resized to fit the addressing area but will be no smaller than the 9pt type.
Please see the example below:

Yes. You will have to approve the PDF proof provided in the My Account section. The PDF proof will show an example of one address on your artwork. On Approval, we will process your order. Else new Files have to be provided in case of any issues with the current one. You can send the Files to [email protected] for further action.
| Your artwork should be designed with a Vector-based application (Adobe Illustrator (AI), Corel Draw) with all text converted to outlines. Please save it as a .eps or as a .pdf and upload the files. You can also upload your artwork in other file formats such as .TIF, .TIFF, .EPS, .AI, .PSD, .JPG, .JPEG, .PNG, .PDF. But, If your artwork is designed in raster format such as JPG, TIFF, etc. then it is necessary, that the original file should be included while submitting the files. The files must be at least 300 dpi resolution and the art to size. |
| Promotional products like T-shirts, mugs, or any merchandise can be decorated with your logo with multiple decoration methods. The decoration method is specific to a product. The various Decoration Methods being offered are as follows: |
- 4-COLOR PROCESS
- COLOR IMPRINT
- CUSTOM LABEL PRINTING
- DEBOSS
- DIRECT PROCESS
- EMBROIDERY
- EPOXY DOME
- HXD
- INFUSION
- LABELING
- LASER
- LASER - APPAREL
- MIXED MEDIA
- OFFSET PRINTING
- PHOTOGRAFIXX
- STAMPING
- SUBLIMATION
- TRUE EDGE TRANSFER
The most common method of achieving color in printing is referred to as CMYK, four–color process, 4/c process, or even just process.


Color imprint method utilized to transfer ink colors onto your item with a printer.


We offer select styles with an "imprint panel" inside the neck or on a pocket bag, allowing you to add a unique personal message or create a branded collection.


*Label Print must be done in conjunction with another decoration method.
Ideal for waterproof and other technical fabrics, deboss uses a die that's heat-pressed into the material, creating a striking 3D appearance.


This four-color process can reproduce the widest range of hues with the fewest inks. It is available only for white items.


Embroidery refers to clothing that has a pattern or logo stitched into its fabric.


Add dimension and shine to your one-, multi- or 4-color logo by placing it under a clear, high-gloss polyurethane dome with a black bezel. Logos are maximized for the best possible display and then placed on a white background unless otherwise specified.


HXD combines the raised surface and high-value appearance of embroidery with the range of colors found in True Edge Transfer for a new level of branded apparel.


inFusion is a decorating method that seamlessly joins logos with our custom-made fabrics, creating a stylish image that is both lightweight and permanent.


An ideal decorating method for items such as lip balms. Customization for brand visibility with four-color imprinting can be placed onto clear, white, or holographic TufGloss™ labels. They are scratch-resistant and waterproof.


Laser printing is an electrostatic digital printing process.


Laser engraving gives your logo a clean, distinguished appearance by precisely etching the artwork into the material’s surface.


Mixed Media is a bold new decorating method that combines two processes. Using a laser as the base for embroidery, transfer, or PhotoGrafixx overlay.


Offset printing is when 4 colors (CMYK) are combined to print a wide range of colors. This process is most common in photographs. When blended, these colors reproduce the widest range of color.


These classic methods allow you to leave an impression of your logo on a material’s surface.


A permanent heat-transfer method, sublimation incorporates multi-color and half-tones for unique designs that won’t crack or peel.


True Edge Transfer is a cutting-edge heat transfer process that provides superior clarity and precision to the printed artwork on the garment.


 Signs
Signs